How To Automate API Testing Like a Piece of Cake

I. Introduction
Although many people have a basic knowledge of API testing, they do not know how to use API when embarking on a project required to use API testing. Great, if you are in the same situation, this article is for you. It will cover the critical and necessary content about testing by API so that anyone who does not know anything about API can confidently apply and perform API testing on projects effectively.
II. Test Cases - Breakdown Process
Testing is the process of implementing activities with the intention of identifying bugs, in which, defining test cases is one of the critical activities in the testing process.
The below image is an example of a diagram of the breakdown test cases process created by our testing team.

The diagram: The breakdown test cases process
Create API test cases summary
Let’s begin with creating an API test case summary before you execute tests. So what is the API test case summary and how to break the test case? Well, it is simply a title that covers the case you would like to test. Based on the required functions mentioned in the API doc, you will write the API test cases summary including function and validation. These API test cases summary should be created by using test case management tools like QASE, Zephyr, or other tools depending on your project’s requirement.
Function
A functional test case assigns the testing of a function or feature in order to see if it produces the expected result as mentioned in API documentation. Every new feature and function must be tested before release, and most need to be continuously tested.
Validation
Validation test cases are considered negative cases. Unusual test cases are checking for invalid input and verifying the system isn't doing what it's not supposed to do. The purpose of validation testing is to make sure that the system validates invalid inputs by giving an error message.
Sample for function and validation test cases summary
Sample 1: When you want to write an API test case summary with the function “Search an appointment by valid appointmentId”, it is possible to follow the example below.
Summary: Verify appointment's information is returned when using GET method with valid appointmentId
Expectation: An appointment is returned including all required information of this
appointment
- Status code
- Schema
- Properties and values
Sample 2: When you want to write an API test case summary with the function “Search an appointment by invalid appointmentId” (It is considered a validation case), you are able to follow the example below.
Summary: Verify appointment's information is not returned when using GET method with invalid appointmentId
Expectation: An appointment is not returned and an error message is displayed with the following information
- Status code
- Schema
- Error messages/ Properties
III. Test Scripts - Implement Process
Work Process
The Postman tool is applied to take examples of API testing throughout the article. The below diagram is the API working process on the Postman tool of our team. Please look over and read through it carefully to understand each stage in more detail.

The diagram: API working process on the Postman tool
Setup team’s workspace on Postman
Firstly, you need to create a Workspace so that the team can work uniformly on it and avoid influencing the work of members in other workspaces, which helps the operation of other Postman functions not affect the main branch in the created Workspace.
To create Workspace, follow the following steps:

Create a collection
The first collection is considered as the main one. It is a set of all requests related to a specific project. In particular, all the folk collections will be created from it. Follow the following steps to create a collection:

Create a folk collection
If a team has more than one member working in Workspace, each member should create a folk collection and work on it not to affect the main branch.
Follow the below steps to create a fork collection:

Create requests in the collection
Once you've created your own folk, you are ready to start doing your work. In addition, you can create a new folder, subfolders, or many requests in the folk collection. However, it's better to make a discussion with the team to determine which folders should be identically added to contain the requests. And, one collection should include a folder of function, a folder of validation, and a folder of schema verification to manage more easily and effectively.
- To create a new request, follow the below steps:

According to the provided API document, you can create a request with sufficient information. In case of a lack of the API document, perform a manual test case on the UI and take notes of the necessary information for a request.
The required information to send a request includes Endpoints, Method, Params, Authorization, Body, Pre-request Script, and Tests.
- baseUrl: This is the main URL of the website
E.g. https://shop.com/ - Endpoint: This is the part right after the baseUrl, each request has its own endpoint for a specific function.
E.g. https://shop.com/login => /login is the endpoint - Method: Depending on the purpose of the test case, you have to choose the suitable method.

- Params: This is essential information so that the request can correctly operate with its purpose.

- Authorization: Most websites have their own security settings, so your request must also be set to be able to access the system. To install authorization you need to perform the following steps:
- First, you request to login into the system. In the body returned from the response, you will see the properties for the token (can be accessToken or token)
- This code will be used for the next requests by inputting it in the Bearer Token option in the Authorization section

- You can set this code as an environment variable to make it easier to use and manage
To create the token as an environment variable, follow the steps below:
- Create this script in the Tests section of the Login request

- Go to the Authorization section of the next requests and input the name of the variable saved

- Body: When you perform requests to add, delete or edit information on the system. Where you can enter that new information in the Body section. For instance, with a request that you want to adjust timeRanges, you need to enter updated information in the body and note to change the format to [raw] and [JSON] so that Postman can understand the input.

- Pre-request Script: This section is equivalent to the pre-condition section of the manual test case. It contains all the information you want the request to do before it executes the content of the Tests section.
- Tests: After executing a request, you need to create a script to check significant checkpoints to determine if the test case has met the passable criteria.
- As mentioned above, there are 3 checkpoints that need to be verified including status code, schema, and properties
- Environment: Select the environment that the collection/ requests belong to.
For example:
With the test case: “Verify value on the response body equal to 100”, you will have a Testscript section that consists of three sections as below:

- Test Results: After clicking the Send button, your request will run and return the results. Go to the Response section below, and click the Test Results section to see the results.

For example 1:
- When creating a new request for a function, you have to include the following information
- Test Case summary: Verify employeeId is able to be sorted by increasing when using the sort function
- Param:

- Test script:

- Test results:

For example 2:
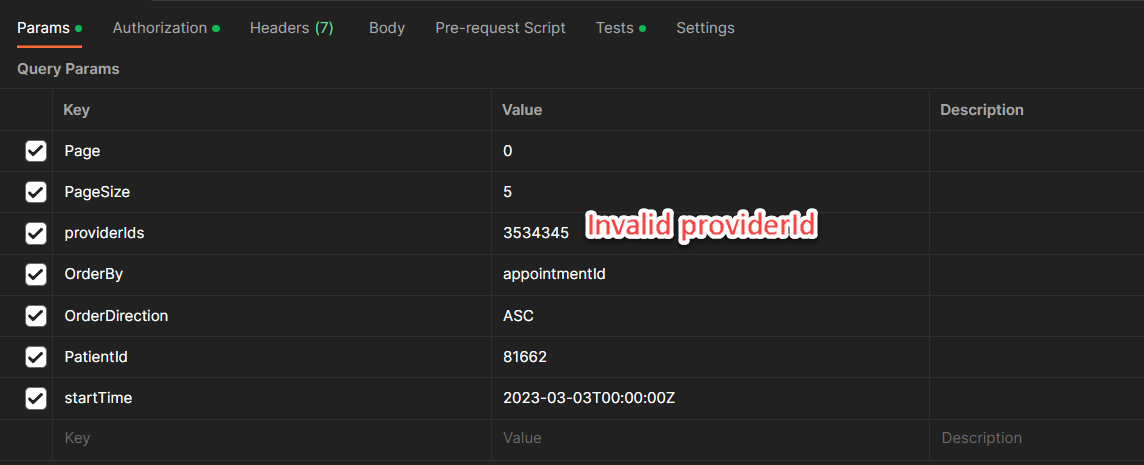
- When creating a new request for validation, you have to include the following information
- Test Case summary: Verify error message is displayed when searching with invalid providerId
- Params:
- Test script:

- Test results

Run folk collection
After completing all the requests in the folk, you can run them in the folk to ensure that they all work well when run together, which is indispensable and to be done regularly. You can run every time a request is finished to secure other requests are not affected and detect errors as quickly as possible.
To run a collection/ folder, click the three dots icon at the Collection/ Folder and click Run collection/folder.
Note: Please remember to choose the proper environment for collection/ folder before clicking Run

All requests inside that folder/collection will be visible for you to make adjustments. You can choose which requests you want to run or change the location without affecting the order of requests in the actual folder. Then, click Run {file name}

Create a pull request
Make a comparison of your folk with the latest content on the main branch before you merge your folk collection on the main collection. In case, there is someone updating your part. When you merge your folk, it can affect the content of both parties and test results.
To compare, check by clicking the three dots icon at Collection and click Merge changes. You will know what you have added or removed from the system here.

After making sure that your branch does not affect the current state of the main branch, you can proceed to create a pull request.
To create a pull request:
- Click the three dots icon at the fork Collection
- Fill in the Title
- Add the description if necessary
- Select a reviewer at the Reviewer dropdown list
- Click Create pull request

Review and Merge fork collection
After creating a pull request, you have to wait for approval from the reviewer.
There are two situations that can happen:
- If your branch is approved, it will be merged into the main branch.
- If your branch is rejected, you have to re-check and update your request to meet the reviewer's requirements.
Remember that all members of a team are required to re-create the folk collection from the latest merged collection and delete their existing fork collection to continue implementing, which limits the conflicts when you create a pull next time.
Implement
Most of the testers have a tendency to be concerned about verifying the response status and values at body after sending a request. It’s right but not sufficient. There are three parts playing important roles when you test API are status code, JSON key and value, and schema. For this reason, you need to verify all of them by writing scripts code to determine whether or not the request returns the response accurately and the keys-values are corresponding to the ones in the API documentation. And especially the schema Let’s identify each part in more detail.
Verify status code
It’s super easy to write script code for verifying the status code of a request. Look over the example of a successful case below to get insights.
pm.test("Verify status code", () => {
pm.response.to.have.status(200);
});
This test script is available in Postman so you don’t need to try to remember. If you are afraid of forgetting, copy the code above. Depending on the API documentation, it is expected that each request will have a different status code, thus you need to change the suitable value of the status to get the best test.
For example: Sending a request to get status code 400 Bad Request. The value of status should be changed into 400.
pm.test("Verify status code", () => {
pm.response.to.have.status(400);
});
Access this link to know more about HTTP status code.
Verify properties and values in response
This article will help you to write simple test scripts to verify properties and values to make sure that they match with the ones in the response body. Obviously, this test script just applied for the requests containing body in response.The following example aims to verify the value of the providerId in an object when sending the request with test case summary“Verify appointment's information is returned when using GET method with valid appointmentId.”
var response = pm.response.json();
pm.test("Verify the value of providerId", function () {
pm.expect(response.providerId).to.eql('348');
As you can see, writing test scripts is quite the same as writing a normal test case. It includes what you need to test and your expectations.
You can access this link to discover more test scripts to validate values
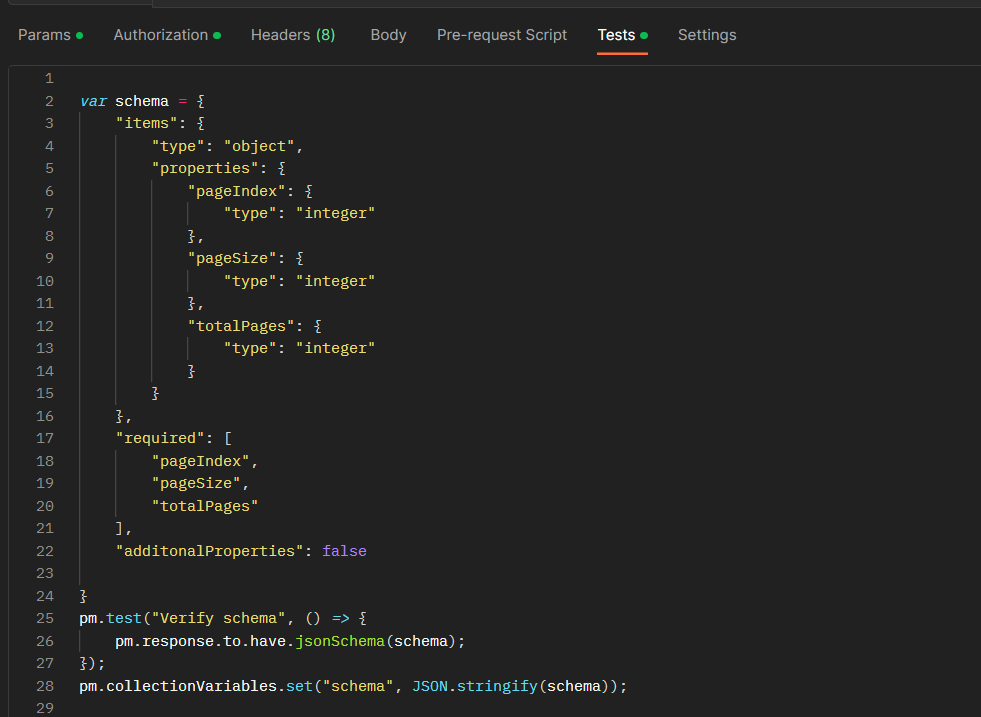
Verify JSON schema
The reason to write JSON schema is to construct a model of your API response and validate the response of an API call, ensuring that the values in API responses are valid in terms of type and format. If there is something modified from the back-end, you would realize the changes immediately when using the schema test scripts.
This is a simple example of using a JSON schema to validate API responses.
var schema = {
"items": {
"type": "object",
"properties": {
"pageIndex": {
"type": "integer"
},
"pageSize": {
"type": "integer"
},
"totalPages": {
"type": "integer"
},
"totalItems": {
"type": "integer"
},
"items": {
"type": "array",
}
}
},
"required": [
"pageIndex",
"pageSize",
"totalPages",
"totalItems",
"items"
],
"additionalProperties": false
}
pm.test("Validate schema", () => {
pm.response.to.have.jsonSchema(schema);
});
Monitoring
You can run API test scripts, chain together multiple requests, and validate critical API flows with Postman Monitors. Collection-based monitors give you continuous visibility into the health and performance of your APIs.
With the monitor running, you'll be alerted to any test failures, so you can fix issues before your API's consumers are affected.
Setup Postman’s Monitors
There are two ways of creating a collection-based monitor.
- Create a new monitor from the left side bar, you will select a collection to run when configuring the new monitor.

- Create a monitor from the collection, the new monitor is automatically configured to run the selected collection.

You can access this link for further details.
Maintain
By monitoring APIs, you can identify whether APIs are available, APIs are functioning as expected or there are any below-average APIs that may lead to application, website, or dependent services failure. API monitoring ensures everything is working correctly every day. When an API fails, applications and websites rely on it as well. It is better for you to set the monitor to automatically send notification to your email so that you can immediately know whether APIs are working perfectly or not.

IV. Issues and Solutions
There are a few issues you may catch during the time working with API testing.
Missing API document
It is indispensable to have API documentation when testing the API. It contains the essential information to test API exactly such as endpoints, methods, query parameters, and schema in the body response, stuff like that… to make sure everything meets the requirements. However, what should you do if you lack API documentation or the API documentation is outdated? Of course, you will immediately ask the back-end developers who are in charge of creating it, yet they do not have time to update or they are also new ones in the project. The best way to test an API effectively is to open Devtool on UI to get all the necessary information for an API. Besides, you must ask the developers for sending the information of properties in a body response to avoid being short of any important properties.
Verify schema with long and complex Javascript code
It is believed that you will take a long time to write and verify schema test scripts at the beginning of working APIs. When there is someone modifying your schema somewhere accidentally, you have to recheck all test scripts. To resolve this issue, you just need to narrow the scope of the schema that is related to your task or the function required. This schema focuses on the necessary properties, but does not cover all the properties in the response body.
For example: You are required to test an API request that returns many properties in the response body, in which there are two types of properties modified. In this case, you only need to verify the schema of two properties instead of all properties.
Duplicating verify schema scripts in every request
It can be said that this issue happens with almost every tester for the first time doing API testing. But there is a great way to reduce the duplication of scripts for verifying schema. This article will show you what to do when you are in the same situation now.
If there are multiple requests having the same schema, you just need to write one schema script and then apply the script code below in each request. This will make your tests look shorter and clearer. Remember to change and replace the variable names suitable for your purpose.

Limit run of Postman’s Monitors
As far as I know, if your team uses the free version, your team merely has 1000 monthly API calls for monitoring and scheduled collection runs. You can get more API calls by upgrading to any of paid plans.
On the other hand, your team can give it a try in other ways like running a collection locally with the Postman CLI, or in Docker with Newman.
E.g. Run your collection in Bitbucket pipeline
image: postman/newman:5.3-alpine
pipelines:
custom:
Test:
- step:
trigger: manual
caches:
- node
script:
- newman run "https://api.getpostman.com/collections/$uid?apikey=$apiKey" \
--environment "https://api.getpostman.com/environments/$uid?apikey=$apiKey"
Access this link for further details https://learning.postman.com/docs/postman-cli/postman-cli-run-collection/
V. Advantages and disadvantages (with rest-assured)
Advantages of the Postman Tool:
- Postman tools can be used without any licensing cost but some features are under the pricing mode.
- It is an easy to use tool with a Graphical user interface and can be accessed easily after logging into your Postman account.
- With the help of the Newman tool or Collection Runner, Postman can be used to execute tests in iteration.
- Using collection, Test maintenance becomes easy in Postman.
- Postman can be used directly for testing different API Formats like REST, SOAP, and GraphQL.
- Postman tool can be integrated with the CI/CD pipeline.
Challenges while using the Postman Tool:
- Advanced features like multiple integrations, advanced reporting, and analytics are covered under the pricing model.
Advantages of the REST Assured Tool:
- It is an open-source tool.
- It supports the BDD format, which makes it easy to read the tests.
- Code can be scaled and re-used in REST Assured.
- Easy CI/CD integration.
Challenges with REST Assured Tool:
- The Test team needs to have knowledge of the Java programming language and BDD framework.
- Setting up the project can be difficult.
VI. Conclusion
After all, I hope that all things above can help you understand more about how to apply API testing. I just share the knowledge I learn from practical projects. Therefore, if you have any new discoveries, don’t hesitate to share them with me and everyone.


