How to Setup CI/CD with CircleCI and Deploy Your NodeJS Project to a Remote Server

In this article, I will share with you the concept of CI/CD and apply it to a practical scenario.
What is CI/CD and why should I use CI/CD
CI/CD stands for continuous integration and continuous delivery.
-
Continuous Integration is the process in which all code changes from multiple developers are automatically merged into a single shared repository. Then each integration is verified by an automated tool that checks for code style and runs tests before each build.
-
Continuous Delivery expands upon Continuous Integration by deploying all code changes to a testing environment and/or production environment after the build stage. In order words, all-new features, bug fixes, … will be delivered to the hand of testers/users frequently.
→ This practice of CI/CD significantly reduces the cost of manual operation for developers, hence improve productivity and shorten deployment time.
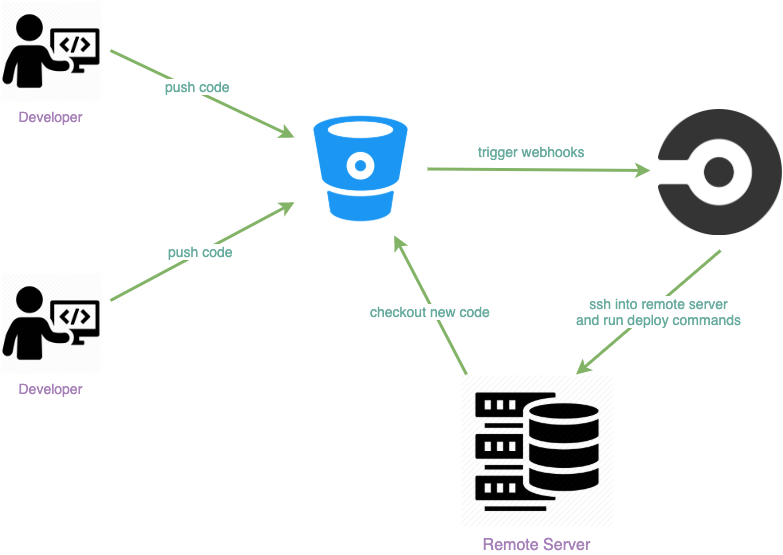
Practical scenario:
-
A group of developers working on a NodeJS project
-
All code changes from developers are pushed to a Bitbucket repository
-
With each commit pushed to the repository, CircleCI will be triggered. It will check out the latest code, install dependencies and run tests
-
After all, tests are passed, CircleCI deploy code to a remote server via SSH
Why choose CircleCI over Jenkins (and other alternatives)
Besides many other CI/CD tools, in this article, I only compare CircleCI to Jenkins — the most popular CI/CD tool of all time.
First of all, and probably the most distinct difference between Jenkins and CircleCI is that you need a server to host Jenkins there, which requires administration knowledge and a considerable amount of time for configuration/customization. Meanwhile, CircleCI is a cloud-native platform, which means you do not need to set up any server, it just runs out of the box.
Secondly, Jenkins interface is rather old and unintuitive, whereas CircleCI’s design is very friendly. When it comes to configuration, with CircleCI, the yml syntax is clear and easy for developers to read.
In conclusion, CircleCI is a lightweight CI/CD platform that supports almost every programming language out of the box. Developers can also deploy to AWS, Azure, Google Cloud, Heroku, and many other clouds hosting services.
Demo
Prerequisites:
-
Node.js project stored in a Bitbucket repo
-
CircleCI account
-
Remote server that you can connect via SSH. On this server, you must install git, Node.js, and pm2 (recommended tool to manage Node.js processes)
-
Basic knowledge of SSH
Setup
1. Configure CircleCI to track commits on Bitbucket repo
-
Create a folder named .circleci at the root of your project, add config.yml file to this folder with the following content:
For a more detailed specification of how to configure CircleCI, please refer to this document.
-
Add your Bitbucket repo to the CircleCI project
→ Now, CircleCI is able to perform the build job specified in the config.yml file.
2. Configure the remote server so that CircleCI can perform the deploy job
Generate an SSH key pair which we will be using throughout this tutorial by executing this command on the terminal:
ssh-keygen -t rsa -C “[email protected]”
You will be asked a few questions, remember to let the passphrase empty (at the time when I wrote this article, CircleCI requires an empty passphrase).
→ The results are 2 files: id_rsa (private key) and id_rsa.pub (public key)
-
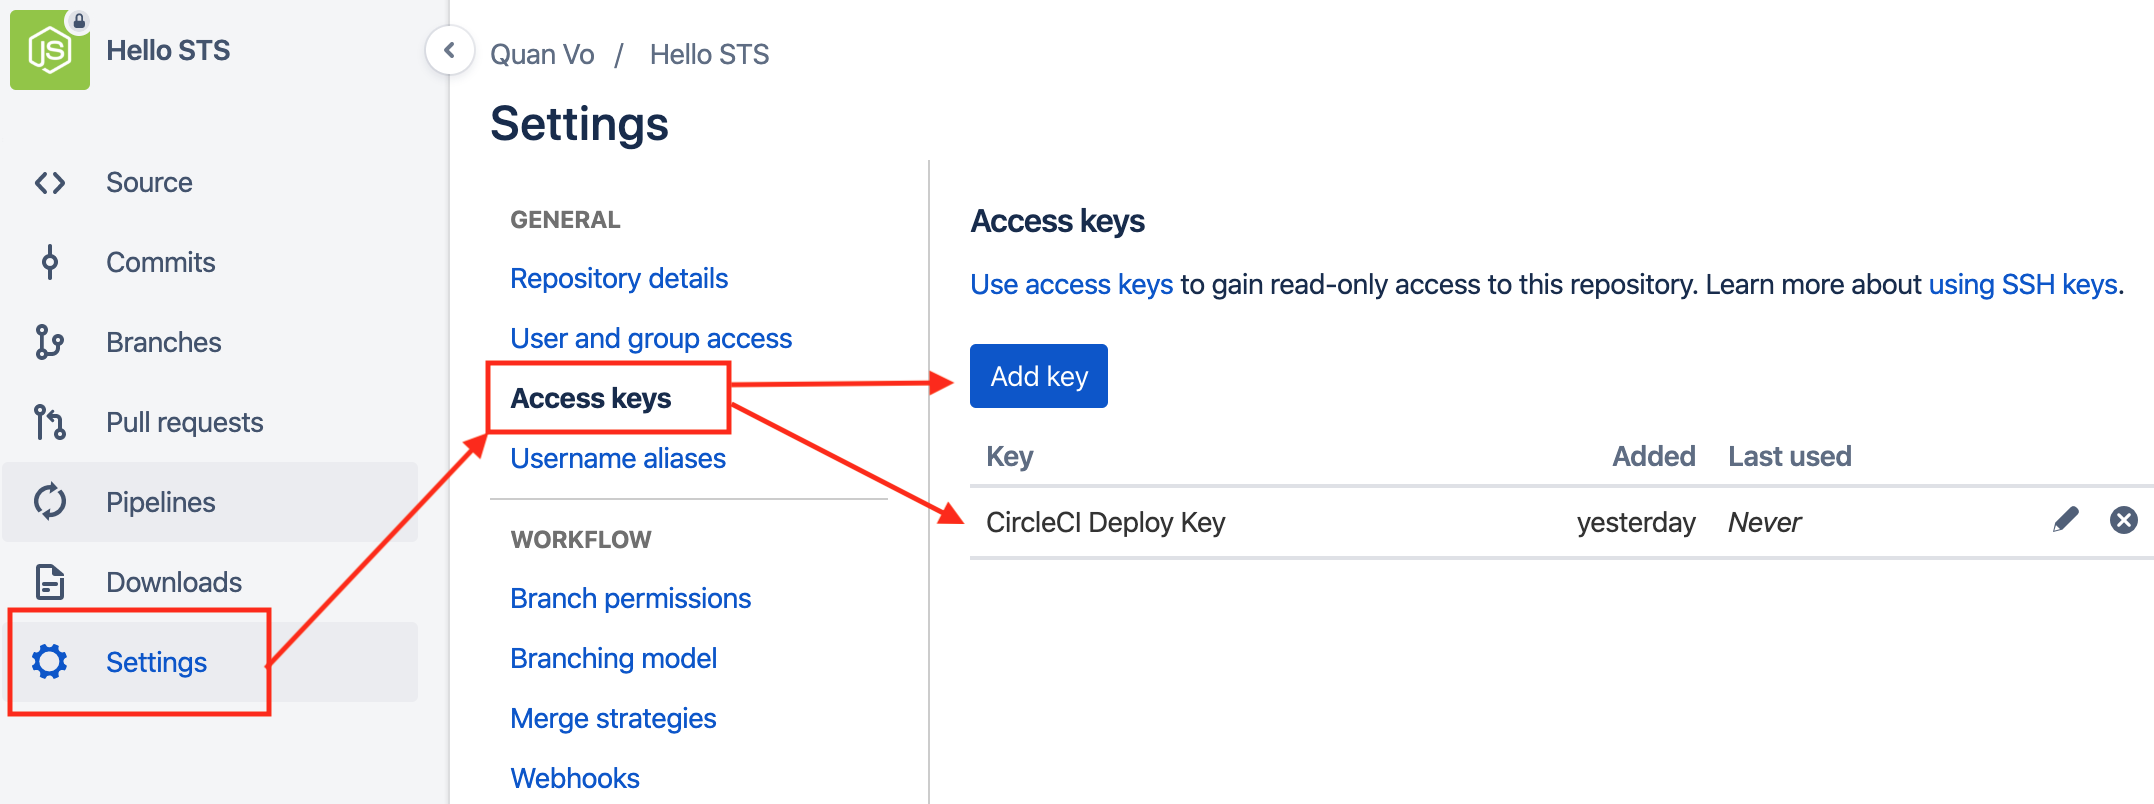
In Bitbucket repo settings, check if CircleCI Deploy Key has been automatically added, then copy id_rsa.pub and add another key there
-
In the CircleCI project setting, copy id_rsa and add your private key there
-
In your remote server, append your public key to authorized_keys in ~/.ssh by executing this command:
cat ~/.ssh/id_rsa.pub >> ~/.ssh/authorized_keys
-
In your remote server, copy your private key into ~/.ssh folder and modify ~/.ssh/config file to include:
Host bitbucket.org
HostName bitbucket.org
IdentityFile ~/.ssh/id_rsa
-
Add your private key to the ssh-agent by executing this command:
eval "$(ssh-agent -s)"
ssh-add -K ~/.ssh/id_rsa
→ Now every time you push code to Bitbucket, CircleCI will pull code from there and perform a build job on their cloud. After that, it performs a deploy job by connecting to the remote server via SSH, then automatically runs the deploy command on the remote server to pull code from bitbucket, then pm2 to start/restart the process as specified in the config.yml file.
ssh -p your_port_number your_user@your_host
"cd .. /path/to/your/project;
git pull;
pm2 start hello_sts";
You are done!
Good job! You have successfully automated the development and deployment processes with CircleCI. Now, without the need to perform manual tasks, your team can work effortlessly to deliver the product in a timely fashion.
This basic tutorial aimed to give you some fundamental knowledge of CircleCI to kick-start you on the DevOps journey. To master the power of CircleCI, dive right into its documentation. The capabilities are endless with so many features waiting for you to explore:
-
First-class Docker support.
-
Workflows for job orchestration.
-
Debug with SSH. Caching.
-
Gain insights about your repository with a visual dashboard.
-
Deploy your application to AWS, Azure, Google Cloud, Heroku, …/


